Test Driven Development with Gradle and Kotlin
Here is a short introduction to using Gradle and Kotlin in IntelliJ. This setup is perfect for Test Driven Development.

Using a build system, such as Gradle or Maven in the JVM world, will make it much easier to incorporate unit tests into your application. Using the standard conventions of a build system allows you to concentrate on writing tests and code without needing to make choices like project structure or how to build a deployable artefact.
This post looks at the simple steps needed to set up an IntelliJ project using a Gradle and Kotlin. We explore the files and folders that are created and look at some basic build commands. In the next post I will add version source control to the project and configure it so that it runs tests.
Convention Over Configuration
Each language choice and build system will look a little different from each other, but most share some common features:
- the need to organise dependencies (other projects that your code relies on to work)
- where and how to structure the source code, test code and resources folders
- steps for compiling code and tests (if necessary) and running tests
- means to package the application, possibly generating different artefacts to target multiple environments or systems
This simplified list is only scratches the surface, but already is a lot to cover. Rather than have to design each application from scratch, build systems have evolved to use conventions so that we don’t need to decide each time we write a program how to arrange everything.
For example, test code is usually kept separate from the source code that will be deployed in the application. With Gradle and Maven, the convention dictates the following folder structure for every project:
src
  - main
    - java
    - kotlin
  - test
    - java
    - kotlin
This convention, as with all conventions, can be overridden with configuration. That is useful if moving a code project from an older, legacy build system into one of the more modern ones. If the source code is not in the expected location, you can let the new build system know where to look. Eventually the code should be moved to the conventional location and the configuration removed; configuration allows this to be done in steps, checking that everything still works at each step.
IntelliJ
Most integrated development environments (IDEs) provide a means to generate a base project using a simple UI. Within IntelliJ, this option is under File -> New -> Project.... Eclipse and other IDEs use a similar approach, but note that the options and files generated will be similar but have some minor differences.

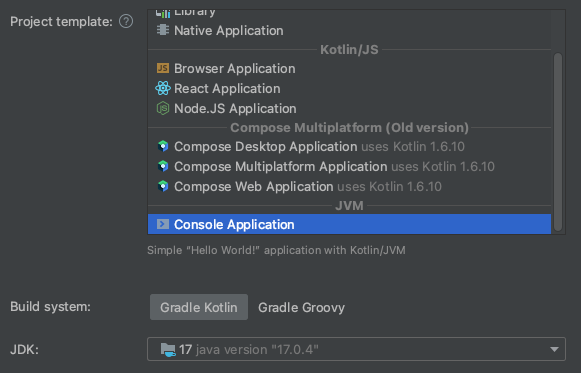
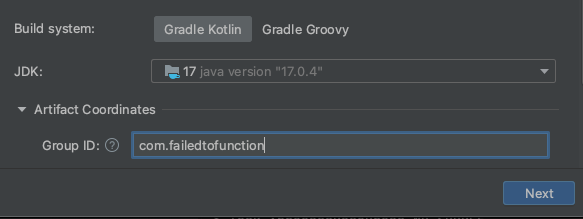
From the list of Generators choose Kotlin Multiplatform and then a simple Console Application. Give the project a name and location on disk. We are going to use the Gradle Kotlin build system. Gradle Kotlin uses a Kotlin script rather than Groovy to define the project, and I find it a little easier to read and manage then Groovy code of which I am less familiar.

You may need to provide artifact co-ordinates which will uniquely identify you project. Usually this is the domain of you company in reverse order. I’ve used this blog site as my artefact: com.failedtofunction. If you don’t plan to publish the code, don’t worry too much about this.

On the final screen set the Test Framework to None. Let’s start without any testing framework and add it manually to show how simple it can be to do so.

The Files and Folders
IntelliJ produces the project files and folders and some initial configuration. It then runs an initial build, called :wrapper, that downloads the Gradle wrapper. The files and folders at the end of the process look like this.
  - .idea/
  - .gradle/
  - gradle/
  - src
    - main
      - kotlin
        - Main.kt
      - resources
    - test
      - kotlin
      - resources
  - build.gradle.kts
  - gradle.properties
  - settings.gradle.kts
  - gradlew
  - gradlew.bat
The .idea/ forlder contains configuration for IntelliJ. Some organisations commit this to source control, as it may contain configurations for running and debugging the application, but it is equally likely that this will be omitted from source control.
Gradle has created two subfolders in the project. The first, .gradle/ is used when building the project. This can be omitted safely from source control. It also creates a gradle folder which holds the Gradle wrapper. Generally teams add this to source control as it ensures that the project will run using the same version of Gradle when building on different machines or in a Continuous Integration pipeline.
The src/ folder contains all source code, split between test code and the main classes and configuration files that will be compiled and built into a deployable artifact. It is possible to combine mulitple JVM languages, as they all produce interoperable class files, so next level of division, a folder called kotlin, is where packages and classes written in Kotlin will be stored. The resource folder can hold anything else required for the build, test or deployable artefact, for example, application configuration files or web page templates. There is a sample class created called Main.kt which has a simple, Hello World! program.
There are some other files located at the root level, the build.gradle.kts is the build script for the project and gradle.properties and settings.gradle.kts contain project configuration. There are two build executables, gradlew for Linux flavour systems and gradlew.bat for Windows. Kotlin projects using Gradle can be run on any computer with an internet connection simply by running the build command. Let's do so now.
Building and Running the Project
You can either use the IntelliJ UI or the command line to build and run the application. If the Gradle tool window is not visible, you can add it using the View menu under Tool Windows and Gradle. From this menu expand the project Tasks tree to expose the build group and then build task. Double click to run the task. Alternatively type ./gradlew build at the terminal or command line. IntelliJ has a built in terminal window you can add using the View -> Tool Windows menu.

Assuming this runs OK, you will notice that there is now a build/ folder added to the project. This is where all class files are generated, for both the main application and the test code. Any resource files are copied here also. The build artefact will be created in the build/distributions/ folder. For this initial sample project, there should be a .tar and .zip archive using the default settings.
There is not much code in this project yet, but it can be run. Type ./gradlew run to get it to print Hello World! to the screen. You can also run the application using the Gradle tool window under application -> run.
Summary
This post covered how to generate a new Kotlin project using Gradle as the build system and described the files and folders is creates. We also looked at the basic build steps needed to compile and run the project.
We could start to code straight away, adding packages and classes for the new application and replacing the Main.kt with our own, but there are a few more steps that I go through whenever I setup a new project. First thing is to place the project under version source control which will allow us to track changes. Then we need to get unit tests running. I’ll cover both in the next post.
