Running Cucumber With JUnit
Running Cucumber tests via JUnit will ensure that they run each time the project is built ensuring no behaviours will be broken by changing code.

In the last few posts I showed how to add Cucumber tests and how to run them in IntelliJ through the Cucumber for Java plugin, but it would be better if they were to run with regular unit tests. This can be configured with some simple code and configuration settings to ensure that no tests are broken by code changes.
Fast feedback to developers from tests is a key factor in writing bug free code. Developers that follow test driven development are used to running their unit tests often while developing, and also before committing and pushing a change to ensure that the continuous integration server will be able to build the project – that means no failing tests.
I found that there are two ways of getting JUnit to run Cucumber features, so both are presented here. The first should work with both JUnit 4 and 5 with a bit of a hack required for the latter; the second is only applicable to JUnit 5.
JUnit 4 @RunWith Approach
JUnit (from version 4 onwards) recognises tests because each test must be annotated with the @Test annotation. However, the scenarios for our test were written in a feature file for which this annotation cannot be used and the step definitions are functions that only make up a part of each test, and so the annotation cannot be applied to them. What is required is a way to let JUnit know that there is one or more tests that need to be run.
Note that it is possible to configure Gradle to run the Cucumber CLI in the test phase, in other words the same phase that the JUnit tests are run, however, my preferred way is to get JUnit to run the tests.
Adding a Test
We are going to use the Cucumber Junit Runner class, io.cucumber.junit.Cucumber, which implements the org.junit.runner.Runner interface. It can be associated with a class using JUnit’s @RunWith annotation. JUnit also scans for classes with this annotation to find test cases. The implementation acts like a tree of cascading sub-tests and will convert the scenarios described in feature files into test cases, informing JUnit as each test starts, ends and the results of the test.
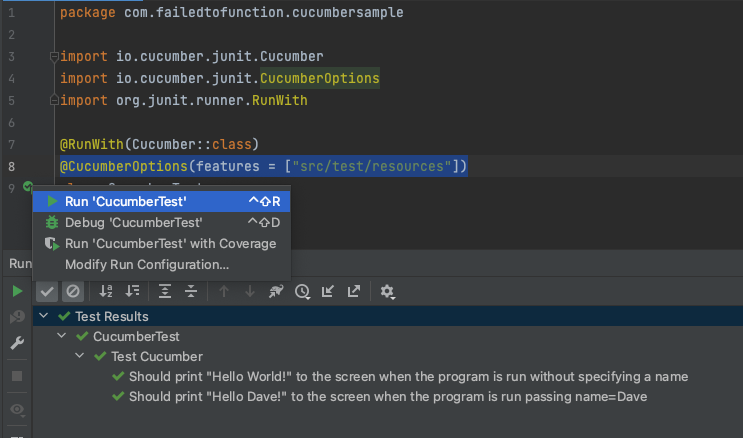
Start by creating a class called CucumberTest. The class will not contain any test functions, rather it acts as a hook into the Cucumber features. There is also a @CucumberOptions annotation which we can use to configure Cucumber. The only option that needs to be set for now is to tell Cucumber where to find the feature files. Here’s what the code looks like.
package com.failedtofunction.cucumbersample

import io.cucumber.junit.Cucumber
import io.cucumber.junit.CucumberOptions
import org.junit.runner.RunWith

@RunWith(Cucumber::class)
@CucumberOptions(features = ["src/test/resources"])
class CucumberTest {
}
Note that if the step definitions are in a different package to this test, then another option is required, namely the glue with the package name where they are located. With this in place the test can be run directly from IntelliJ by clicking the little green arrow beside the class name to access the context menu.

JUnit 5 Hack
I had a problem getting the above to work in my project which is using JUnit 5 rather than 4. One additional tweak is needed to stick with the @RunWith approach. An additional dependency is required to allow JUnit to spot the Cucumber tests. This dependency is only required at test runtime, so can be added as follows just below the Cucumber dependencies.
dependencies {
    ...
    testRuntimeOnly("org.junit.vintage:junit-vintage-engine")
}
It adds the org.junit.vintage plugin which adds a tiny layer on top of JUnit to allow older versions of JUnit to work.
Now whenever Gradle runs the test phase during a build the Cucumber tests will be run alongside them and any issues will be reported with a build failure. For example, running ./gradlew build at the terminal will run all phases including the test phase and ensure that the tests are passing.

JUnit Platform Approach
It may be better to simply upgrade to using the JUnit platform annotations that began with JUnit 5. This is easy enough to do also but requires a different set of dependencies. We will switch the io.cucumber:cucumber-junit dependency to io.cucumber:cucumber-junit-platform-engine and introduce org.junit.jupiter:junit-jupiter and org.junit.platform:junit-platform-suite instead of the vintage package. The dependency section should now look like this:
dependencies {
    testImplementation(kotlin("test"))
    testImplementation("io.cucumber:cucumber-java:7.11.2")
    testImplementation("io.cucumber:cucumber-junit-platform-engine:7.11.2")
    testImplementation("org.junit.jupiter:junit-jupiter")
    testImplementation("org.junit.platform:junit-platform-suite:1.9.3")
}
For this approach to work the test class also needs to be updated to use a new set of annotations. The class should now look like this:
@Suite
@IncludeEngines("cucumber")
@SelectClasspathResource("test-cucumber.feature")
@ConfigurationParameter(key = GLUE_PROPERTY_NAME, value = "com.failedtofunction.cucumbersample")
class CucumberTest
JUnit will find this class using the @Suite annotation and @IncludesEngines will tell it to run the tests using Cucumber. Multiple @SelectClasspathResource annotations can be used to list additional feature files if necessary. Further customisation is done using @ConfigurationParameter annotations. Note that these are key value pairs with the key for setting the glue package imported from io.cucumber.core.options.Constants.GLUE_PROPERTY_NAME.
Summary
It was easy to get JUnit to run the Cucumber tests by adding a class with JUnit’s @RunWith annotation for JUnit 4 or @Suite for JUnit 5. This allows JUnit to find identify that there is a set of tests to run and it delegates this task to Cucumber’s engine. The class acts like a suite of tests and collects individual results for each scenario as if it had its own test.
