Configuration with Spring Cloud Config
Managing multiple applications and services across different environments can become easy with Spring Cloud Config.

Managing multiple applications and services across different environments can become easy with Spring Cloud Config.
Here are four typical problems that you might face with Java applications which are deployed to a range of environments from development, test, pre-prod and production.
Keeping environment settings out of the deployed artifact. The aim should be that a single artifact, let’s say a war, should be able to be deployed to any environment without having to rebuild. If you are using feature toggles controlled by properties, you may want to override these in a test environment. Common environment properties such as those that deal with connection strings and ports, are specific to an environment and might be shared by multiple applications.
Avoid manually changing properties on the server. If you do not have properties managed in source control then you should start doing so. If you do than you should be able to deploy properties directly from source control to the server without having to copy or update files manually.
Storing passwords directly in plain text. There are a number of ways around this issue from using password vaults or having restricted access to property files on the servers. Those solutions require that you work with the Operations team to add and update passwords, keeping them separate from code. Spring Cloud Config has another approach, allowing a password change to be made once, and in source control but not plain text.
Having to restart you application to get updated properties. A major irritation that I have is organising restarts on shared environments, especially ones where users are doing testing. A trivial property change can take a significant amount of time to co-ordinate.
Spring Cloud Config
Let’s look at the set up for Spring Cloud Config and see how it provides a solution for some of the problems above.
The configuration is based in source control (git is preferred). When you commit a change and push it to the config server, applications can start using the new property.
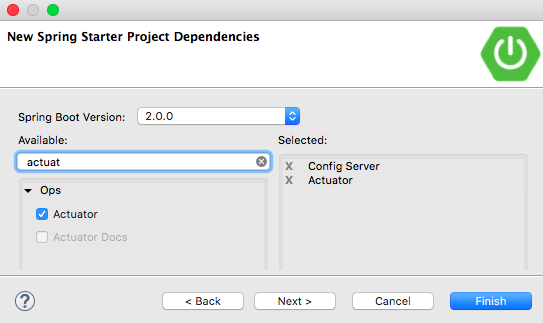
You can start using this really quickly with Spring Boot and the Spring Tool Suite (or the Spring plugin for Eclipse) or by using the Spring Starter site. Create a new project using the Config Server and Actuator starter dependencies.

The minimum amount of configuration required is to add the URI for the git repository to the application.properties and also to change the port to the default port used for a configuration server, such as:
spring.cloud.config.server.git.uri=https://github.com/<your repo path>
server.port=8888
Assuming you are using the maven build, you can run the application with the command:
mvn spring-boot:run
Eclipse or STS have Boot Dashboard that can also run the application and you can also run with the java -jar target/<jar file name>.
Note that if you are working behind a firewall, you may have to set the following properties as environment variables to allow communication with Github. If your git repository is on your network locally, this should not be an issue:
mvn spring-boot:run -Dhttps.proxyHost=<server> -Dhttps.proxyPort=<port>
Also worth noting that you can add resilience by configuring alternate git repositories as backup. You can separate production profile repositories from development and test, perhaps with different individuals allowed to push changes. All this allows a single config server to supply properties to the entire application suite.
Property Repository Structure
All applications that query the server will read properties from the base file, named application.properties (note that yml and json are other valid formats - these examples will stick with properties). This is the default profile that is used in the absence of a specified profile.
To set up a base profile for a development environment named dev you would add another file called application-dev.properties. When a caller queries with dev profile, properties are first populated from the default profile and if any are overridden in the dev version the latter is taken.
You can have as many profiles as necessary covering different environment types, for example dev, qa, test, uat, prod, etc.
An application can have its own properties. This could be named myapp.properties. Only calls to this particular application will return the properties from this file. If any properties here override the global properties, the application entry is taken.
Each application can have a different property file for different profiles, for example myapp-dev.properties. These override anything firstly in the myapp properties, next in the dev global properties or the default global properties.
Furthermore you can use labels in addition to application name and profile to distinguish which properties to return. A label is equivalent to a git tag or release. The client can be fixed at a given release and will not react to later changes until it has been updated to the next release by updating its label. The default label is master.
Note that as applications grow in number, it may be necessary to group the files into sub folders. To do this you need to add a search filter to the config server application. If all application names ended with “service” you could add the following so that each application’s properties could be placed in their own folder:
spring.cloud.config.server.git.search-paths=*service
What Endpoints are Defined?
If you check the spring start up logs, you can see there are many mapped endpoints to query the data. Consider a single application called webapp and two profiles, default and dev. This might have the following files (don’t worry about the contents):
application-dev.properties
application.properties
webapp-dev.properties
webapp.properties
Furthermore in this example, we created a release tag called v1 at some point in the past.
The most common endpoint uses the application name and the profile. If the profile is not set in the client, it will use default as follows:
GET /webapp/default
If the profile is set to dev it would be
GET /webapp/dev
To get the properties as at a particular release tag, simply include the label parameter:
GET /webapp/dev/v1
If the application is not found, only the global properties are returned. The structure of the response shows each level of the hierarchy along with other meta data. If a label is not found an error is returned.
You might not be interested in all the information around how the hierarchy is set up. It is possible to query the raw properties, yml or json file with endpoints like this, note that the labels move the the front of the path:
GET /webapp-dev.properties
GET /v1/webapp-default.json
GET /webapp-default.yml
Using the Config Server
The logging feedback to the screen is usually descriptive enough so it should be obvious if the config server is up and running correctly. Time to start making some queries.
Use Postman to query the settings on port 8888 using a GET request. Assuming the config server is running on the same machine and everything is working correctly, a query to the following URL should return a response:
localhost:8888/webapp/default
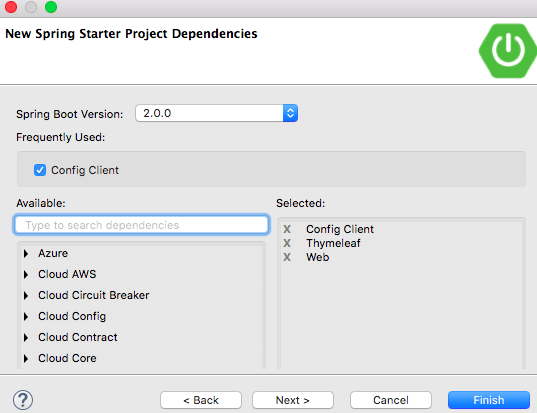
Connecting from a client is easy. Simply include the Cloud Config Client stater in the projects dependencies. It will automatically look for a config server on the same host at port 8888, but this behaviour can be changed easily.

The following lines can be used to configure the application:
spring.application.name=webapp
spring.cloud.config.uri=http://localhost:8888
A further property defines the profile to use - this should be defined externally to the application or at least configured in a bootstrap.properties file so that it loads before any other configuration:
spring.profiles.active=dev
The following is a simple controller to demonstrate the use of the property in the client application (assumes there is a property “rate” defined in the properties):
@Controller
public class FirstAppController {

    @Value("${rate}")
    private String rate;

    @RequestMapping("/rate")
    public String getRate(Model m) {
        m.addAttribute("rate", rate);
        return "rates";
    }
}
The template returned is the file src/main/resources/templates/rates.html and uses the Thymeleaf text tag to display the model attribute with something like:
<p th:text="'Loaded the rate: ' + ${rate}"/>
One drawback with this setup is that the configuration server must be up and running for the client application to start up. If it cannot find the server, by default it will throw an exception.
It this behaviour is not desirable, it is possible to override with the property spring.cloud.config.fail-fast=false. Additional classpath resources are needed, however, spring-retry and spring-boot-starter-aop. The default settings are automatically available, so unless there is a need to change them, no further configuration should be required.
Securing the Configuration
There are numerous options for protecting the configuration from unwanted access. The simplest is to add a username and password to the applicaiton.properties files to enable basic authentication.
Not going to go into this further in this post, but basically all the functionality from the Spring Security project can be included by simply including the starter and setting some basic properties.
Access can be granted at various different levels. For example, a developer may have access to all properties on dev and test environments, but cannot see production properties which may contain passwords (encrypted of course, see below).
Password Protection
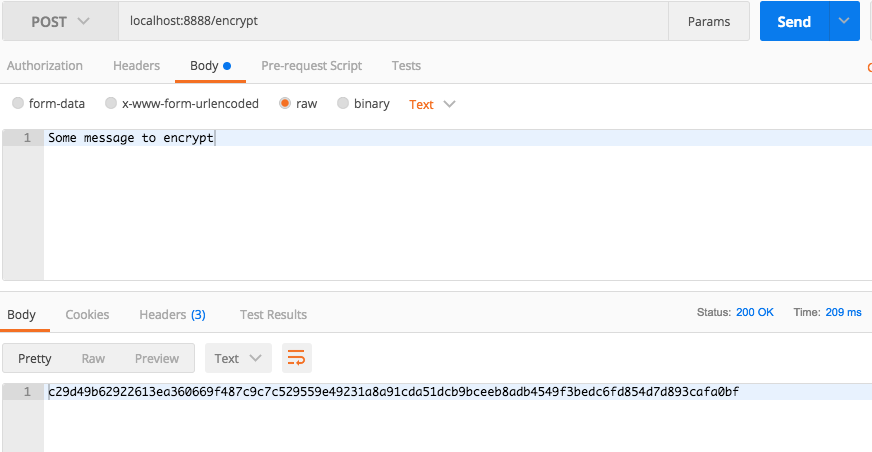
One feature that I like is the presence of /encrypt and /decrypt endpoints which accept POST requests with a payload to be encrypted. A private key needs to be configured for the server. For test purposes you can add this to the bootstrap.properties file of the config server, but ideally it is stored securely separate from source. For example:
encrypt.key=RANDOMSTRINGOFCHARACTERSWOULDWORKBETTER
I won’t go into how to choose a satisfactory key - talk to your Operations team to do so. When the config server is up and running you (or your operations team) can then use Postman to encrypt a connection url or password.
You must download the Java Cryptography Extension Unlimited Strength to make full use of the encryption and decryption features.
Note that public-private key pairs can also be used, given a key store on the server. There is also facility for creating a key store for testing, see the cloud config documentation for more details.
Send a simple message using POST to be encrypted:

Decrypting the string can be done just as simply using the /decrypt endpoint. The encrypted string can be pasted into the properties file, safely shielding the secret. To automatically decrypt it when serving the properties to an authorised client, prefix it with {cipher}. To demonstrate I’ll add the following to the Github configuration settings and restart the server:
mysecret={cipher}15b108d2251e1b5304f331d30b6105d011a795cf7633133b2bc9668aa5e685aac48c6cc7eaacdd89c75841682db0056c
The properties that I now get back from the server now contain the decrypted string:
{
    "environment": "development",
    "mysecret": "Some message to encrypt",
    "rate": "1.91",
}
Again, access to both the decrypt and certain profiles can be placed under different authorisation to keep secrets out of unauthorised hands.
No More Restarts
One of the main reasons for my interest in Spring Cloud Config is the ability to update properties and have applications start using them without restarting. The way to achieve this is straightforward. First include the Actuator starter. This immediately gives the following endpoints that can be seen in the startup logs:
Mapped "{[/actuator/health],methods=[GET]
Mapped "{[/actuator/info],methods=[GET]
Mapped "{[/actuator],methods=[GET]
In addition to the above, a refresh endpoint can be enabled, and you can use the @RefreshScope annotation on a controller so that it can have its properties refreshed by a POST call to the endpoint /refresh.
Depending on the version of Spring Boot you are using, the actuator endpoints may be disabled by default but can be turned on as required. To turn on the refresh functionality you can add the following to the client properties, note that if using this you need to specify all the endpoints to leave on:
management.endpoints.web.exposure.include=refresh,health,info
If you want changes pushed to the master repository to go out automatically, you could configure Github to call a webhook when the repository is updated, giving details of the commit in json format. You could write code to selectively refresh applications based on what changes have occurred.
If there are many clients using the server, this approach could be extended to use Spring Integration to broadcast the updates to all clients. With a little effort, property changes could be deployed without any further action than pushing to the repository.
Feature Toggling
If you use feature toggling to release code in a turned off state, where it might be only available in a test environment, or is only going to be switched on at a certain date or for a limited period, this can be managed using a config server.
A feature might only appear if the application property is set to true. The configuration can be changed and client applications “activated” in a controlled manner, turning on just a single node to check things out before enabling the change system wide. If any issues are spotted, it is easy to reverse the change.
If a feature needs to be toggled between several applications at once, the toggle can be pushed up into the global settings allowing a web application and a back end system to be enabled at the same time.
Best of all is that there is no need to restart either for the turning on or for backing out and turning it off again - simply use the refresh actuator.
