AWS CloudFront
CloudFront is a content delivery network (CDN) for AWS which places your content close to users around the world reducing latency when accessing your site.

CloudFront is a content delivery network (CDN) for AWS which places your content close to users around the world reducing latency when accessing your site.
This post will add a CDN to the static website that was set up in Hosting a Static Website on AWS S3 and configured with Route 53 to map the domain name to the content. This includes setting up a AWS issued certificate to enable secure connectivity over HTTPS.
Content Delivery Networks
A final step is to use AWS CloudFront to improve the performance of the site. A content delivery network caches your page so that calls to S3 are rarely needed. It can also serve site certificates so that access to the domain is always through HTTPS rather than HTTP.
CloudFront has a free tier but will incur a charge above a certain data usage, so be aware of what it is before experimenting with this feature.
From the CloudFront dashboard, click “Create Distribution”. You should be able to select the S3 bucket in the Origin Domain Name field. Most of the defaults can be accepted. I selected the “Redirect HTTP to HTTPS” option so that the web site will be provided securely.
I also entered the index.html field into the Default Root Object to ensure that the page is served correctly if just the raw domain or subdomain is hit.

I left all the rest of the defaults in place and clicked “Create Distribution”. This can take up to twenty minutes to be fully deployed as, it is moving content out to all edge nodes.
Once deployed, you can find the distribution’s domain name from the CloudFront dashboard. This consists of a random set of characters followed by the CloudFront domain, for example, random-string.cloudfront.net. Copy it to a web browser. It should simply show your underlying site. Note that even though I did not request to use HTTPS, CloudFront has redirected my request below to use it, visible by the padlock in the URL bar.

It is unlikely that anyone would be able to remember this link, even if it does serve the content faster than going to the domain name itself. The Route 53 Hosted Zone needs to be configured to send requests to CloudFront so that all requests to clarevilledaycentre.org use the CDN.
AWS Certificate Manager
The problem here is that we have not proved that we control the domain above. Before we can tell AWS to redirect all requests in Route S3, we must go to the AWS Certificate Manager and request a public certificate, then prove we own the site by completing the verification step.
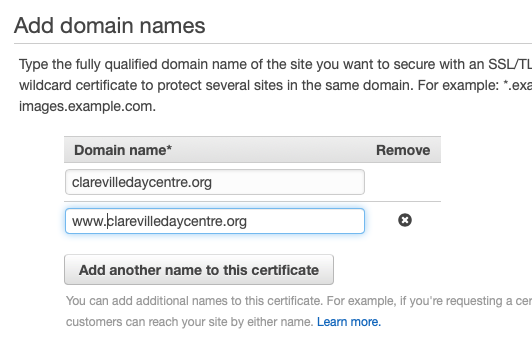
Hit the “Get Started” button and select the option to create a public certificate. The form will request that you enter the domain name for the site that you want to protect. I had to play around with this a little, but I found it best to explicitly name both the domain and www subdomain in the certificate to get AWS to recognise it correctly.

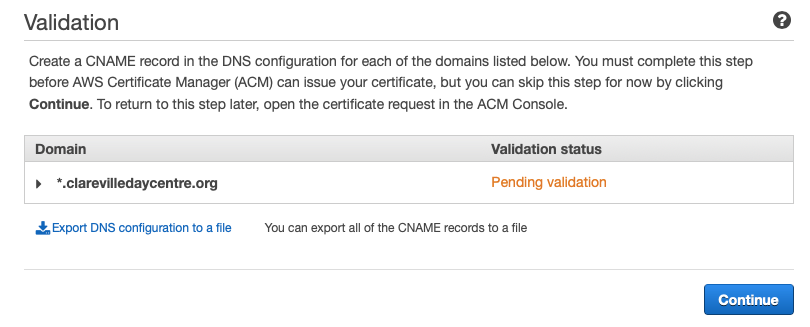
Verification can be done by DNS or by email. Since I have not set up email for this domain yet, it will have to be done by the former option. Review the changes and click confirm. The certificate should go into a state of pending validation.

Note that under certain circumstances, AWS will show a button to automatically import the row into Route 53, but it is not showing up for me. I will have to manually add it to the hosted zone. The configuration required can be downloaded in a CSV file so that it can be easily imported into Route 53. Go to that dashboard next.
DNS Confirmation
In Route 53, select the hosted zone and the correct domain, then select the “Create Record Set” button. Enter a new CNAME record using the details from the CSV file. Be careful not to repeat the domain name in the name field of the form, AWS automatically adds this to all records under the domain. Once saved you have to wait for DNS propagation to take place.
Return to the Certificate Manager console page to check for validation. It should change form “Pending validation” to “Issued” once the operation has completed. This can take a little time, so patience is warranted at this step.

Use the Certificate
Return to the CloudFront dashboard and click on the distribution and select the edit button. First we need to edit the “Alternate Domain Names (CNAMEs)” field and add the names clarevilledaycentre.org and www.clarevilledaycentre.org so that all subdomains will word using SSL.
Under the SSL Certificate section click the radio button labeled “Custom SSL Certificate”. The certificate above is now available for selection here, now that it has been issued.
Route 53 Configuration
The final step is to configure Route 53 to use the CloudFront distribution rather than pointing directly at the S3 bucket. Open the S3 page in the AWS console and click on the Hosted Zone for the domain. Select the A record and delete the bucket from the list. You should be able to select the CloudFront distribution from the list to complete the configuration.
Note that this can be yet another thing you have to be patient with. If the distribution is not listed you can try pasting in the domain, but a warning appears as follows:

Flicking back to the CloudFront console shows that the deployment has indeed not completed. This might be a good time to go and have a cup of coffee, answer some emails, or walk the dog!

Eventually it got deployed, perhaps twenty minutes later, and returning the Route 53 I could select the distribution.
Testing
I tried each of the following pages and they all responded as expected.
- www.clarevilledaycentre.org
- https://www.clarevilledaycentre.org
- clarevilledaycentre.org
- http://clarevilledaycentre.org
However, I noticed that the error page was not working when I tried to access a non-existent resource. The error came back in JSON format as if from a REST end point. There is one further change to make.
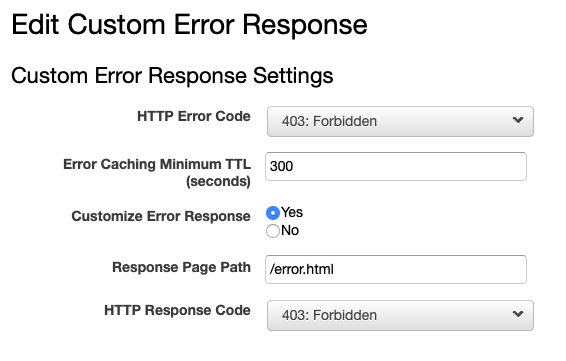
From CloudFront select the distribution and go to the Error Pages tab. Click the Create Custom Error button. The form is a little confusing; the field to enter the path to the custom error page does not appear until you click the Customise Error Response radio button. This differs from some other CloudFront forms which disable the fields rather than hide them.

I used the same error page for a few common error codes. There is not much more than file access going on into a static web site so most codes will not arise. To test, I tried to access the file notfound.html which does not exist and the site’s custom page appears.

Conclusion
I took a bit of a circuitous route in this post, reflecting the journey of learning I was on. I made a few mistakes along the way, but eventually got there. I found that there is decent help within each part of AWS console and it is backed up with thorough documentation.
To use AWS you need to have some understanding of the underlying technology, without being a complete expert in it. There is not much shielding from what is going on under the hood. For example, Route 53 does not add much sugar coating to DNS, and it would be wise to take some refresher courses, as I did, before diving in.
Having said that the services merge well together. I liked the way that once I set up the certificate properly, then it was available to select in CloudFront. And once I had that set up, it was simply a matter of selecting the distribution within Route 53. Each time I hit a block, I was able to find a set of reasons why the link was not working and by the process of elimination, find the problem.
Please send any comments, corrections or questions to [email protected].
