AWS Command Line Interface and S3
The AWS web console gives you access to huge functionality, but is not convenient for scripting or automation. This is where the CLI comes into play.

The AWS web console gives you access to huge functionality, but is not convenient for scripting or automation. This is where the CLI comes into play.
In this post I will cover installing the CLI on mac using home brew and createing an S3 bucket with the CLI. Then I shall upload a file or files to the S3 bucket and demonstrate synchronising, which sends all necessary changes from one location to the other.
Installation
The CLI depends on Python and can be installed with Pip. I prefer to install modules into virtual environments for individual project rather than into my Mac’s home version but want the CLI available for all projects. For those reasons I prefer to install using Home Brew.
brew update
brew install awscli
Note that this failed at first as I was missing a dependency from Xcode and Python. Homebrew gave the command in its output to install additional command line developer tools:
xcode-select --install
What is S3?
S3 stands for Simple Storage Service, and offers secure, scalable, low-cost storage in the cloud. Automatic replication of the files you upload takes place so that if a data center goes out of action your data is safe.
It is also fast and cheap. The free tier allows 5GB before incurring charges. Security is central to S3 and can be applied in a granular manner, so you have a lot of control over your data and who can access it.
To demonstrate some of the things that the CLI can do I am going to use AWS S3 to create a bucket and transfer some files up to it.
My aim is to use S3 as a hosting platform for a static website. It is low cost, easy enough to set up and perfect for a low maintenance, seldom changing personal or informational website.
After making changes to the website on my local computer and testing, the CLI can synch the changes up to the appropriate bucket.
Creating a User
The root user that you signed up to AWS with should not be used for everyday tasks. Turn on two factor authentication and lock the details away until it is needed. But before doing so, you should create another identity using IAM to access the services.
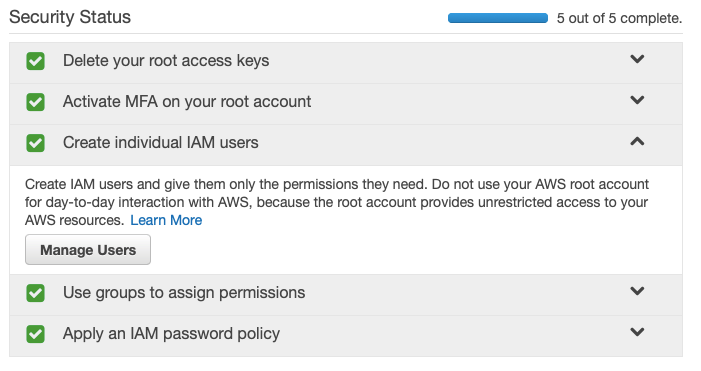
To create a user, log into the IAM page on the console at aws.amazon.com/iam. First that note of the security status steps that are not completed. There are five to get through and I’d encourage you to do them all immediately — as you can see I have already completed them. The one we are interested is to create an administrator.

Click the “Create individual IAM users” and then the “Manage Users”. From there you can add a new user, giving it a name such as administrator.
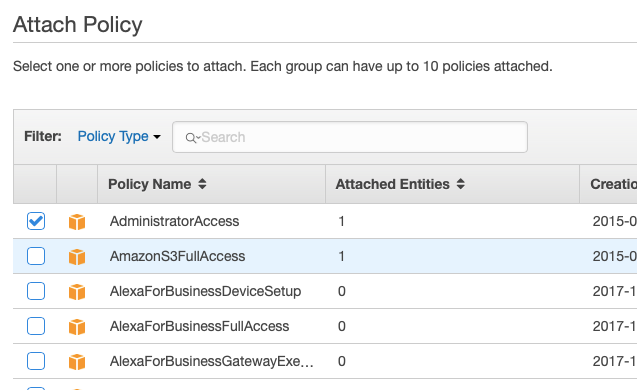
The next screen asks you to create a Group to which it will belong. Groups have privileges that will be shared by all those in the group. First you will have to create a new group, give it a name and then attach one or more security policies to it. To give administrator access, search for the AdministratorAccess policy.

After the user is created the console will show you the access key for that new user. This includes an Access key ID, a Secret access key, the password (which can be auto generated if you want) and a link to sign in from. You can download this as a CSV and also generate an email to send if this is not your own personal account.
The two keys are required to configure the CLI and allow your new user to interact with your AWS resources.
S3 Configuration
The first thing to do is to configure the CLI to work with your AWS account. The configure command will prompt for four pieces of information. For obvious reasons, I have removed my key id and secret here.
$ aws configure
AWS Access Key ID [None]:
AWS Secret Access Key [None]:
Default region name [None]: eu-west-1
Default output format [None]: json
My region is eu-west-1 and I have requested that responses from the CLI are in json format.
Getting Help
Note that there is comprehensive help available from within the CLI itself. Type aws help or for command specific help aws command help to get detailed information.
Note that the subcommands are usually listed down the bottom of the manual page and further help is often available. For example, to get help on the cp (copy) command for S3, type aws s3 cp help.
There is also a great online help system. It is kept up-to-date, just remember to keep your CLI updated so that it matches. See the documentation site for details.
Making S3 Buckets
The top level organisational object in S3 is called a bucket. Within this you can place any type of file. S3 acts like it is a familiar file and folder system but in reality the location with the bucket is a logical position to identify the file. But that doesn’t matter, we will think of the bucket as if it is a filesystem.
Before we create our first bucket, it is important to note that bucket names must be unique across all users. I will create a bucket that includes this blog's url to ensure that it is a unique name. If you try to create a bucket with a name that already exists you will receive an error.
The command you need to make a bucket is mb. As explained in this commands help, to create the bucket called demo.failedtofunction.com, all you need to do is run the following.
$ aws s3 mb s3://demo.failedtofunction.com
make_bucket: demo.failedtofunction.com
Checking the AWS S3 web console, we can see that the bucket has been created.

Copying a File or Folder
Moving files to S3 buckets is straightforward. Imagine you have the following files on your local file system; a base file and a folder with a subfolder and several files.
file.txt
/folder
  abc.txt
  def.txt
  /css
    style.css
Having changed into the base location, to copy a single file up to S3 use:
demo$ aws s3 cp file.txt s3://demo.failedtofunction.com
upload: ./file.txt to s3://demo.failedtofunction.com/file.txt
Note that there may be a small delay before the data is available in the web console. Uploading all the files in a folder is not too different. This time you need to specify the “folder” to place them into and the --recursive option to indicate that all files should be copied up.
demo$ aws s3 cp --recursive folder s3://demo.failedtofunction.com/folder
upload: folder/abc.txt to s3://demo.failedtofunction.com/folder/abc.txt
upload: folder/def.txt to s3://demo.failedtofunction.com/folder/def.txt
upload: folder/css/style.css to s3://demo.failedtofunction.com/folder/css/style.css
Checking in the web console shows that the files have been uploaded. Note that S3 presents the folder in nested fashion, similar to the file structure on a computer.

It is possible to copy files back down from S3, simply reverse the order of the arguments, or from one S3 bucket to another, by specifying both S3 URLs.
Browsing Content on S3
You can check the contents of a bucket of folder using the s3 ls command. It also has a recursive option so that you can see the entire contents of a bucket or folder in one go.
demo$ aws s3 ls --recursive s3://demo.failedtofunction.com
2019-07-25 06:26:10         59 file.txt
2019-07-25 06:32:01          0 folder/abc.txt
2019-07-25 06:32:01          0 folder/css/style.css
2019-07-25 06:32:01          0 folder/def.txt
Synchronising
The last topic I will talk about before deleting the demo bucket is synchronisation. This can be used when the bucket differences are minor and you want to avoid copying the entire contents up; just the changes should be transferred.
For example, you have created a new file locally and now want it deployed to S3. Let’s create a file in the local folder.
demo$ touch folder/new.htmlBefore copying up files, it is usually wise to check what will happen before running the command; it might save deleting something important or uploading something that should not be placed in the cloud. You can do that with the --dryryn option to show what the changes will be.
demo$ aws s3 sync --dryrun folder/ s3://demo.failedtofunction.com/folder
(dryrun) upload: folder/new.html to s3://demo.failedtofunction.com/folder/new.html
Once happy, you can run without the option to send the changes to S3.
demo$ aws s3 sync folder/ s3://demo.failedtofunction.com/folder
upload: folder/new.html to s3://demo.failedtofunction.com/folder/new.html
Removing a Bucket
S3 is free below a 5GB threshold. At some stage a bucket will become obsolete, so it is a good idea to remove it at that stage. This is easy to do via the web console, but you can also use the CLI.
I have completed this demo using S3 and the CLI, so it is time to remove the bucket. Before doing so the bucket must be empty. The rm command can be used to delete individual files and by specifying the --recursive option, the entire bucket can be cleared.
demo$ aws s3 rm --recursive s3://demo.failedtofunction.com
delete: s3://demo.failedtofunction.com/file.txt
delete: s3://demo.failedtofunction.com/folder/abc.txt
delete: s3://demo.failedtofunction.com/folder/css/style.css
delete: s3://demo.failedtofunction.com/folder/def.txt
delete: s3://demo.failedtofunction.com/folder/new.html
Then use the remove bucket command, rb, to permanently remove the bucket. Note you can also use the --force command to remove it even if it still contains files.
demo$ aws s3 rb s3://demo.failedtofunction.com
remove_bucket: demo.failedtofunction.com
Other Topics
Access control lists and permission granting, signing objects and retrieving them using REST calls; I have only scratched the surface of what is available in S3 using the CLI in this post.
The CLI will be the main way that I interact with AWS so it was important to get configured and become comfortable with the structure of the commands. S3 CLI commands will feel familiar to anyone who has worked in a Linux environment.
Next topic will be to host a static web site on S3.
